
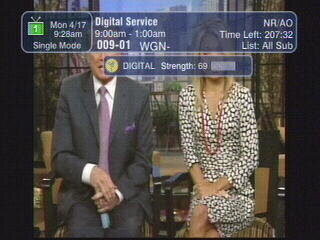
Many people still do not know that they can manually record events from an OTA channel that does not have EPG data. Most are used to recording events that do have EPG Data. The ability to record OTA channels with out EPG Data takes a few more steps but it can be had. Now we step into the wild jungle of the 622 and begin to set up the manual timer..... But, first. there are pictures below for you all to view to see how this is done.. Now,.... I see an Aussie of a VIP 622 over there, lets go see if we can taime this wild beast and record some ota on it.
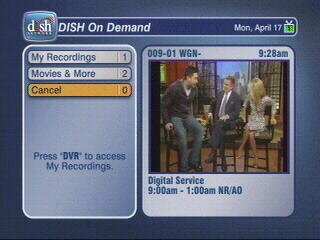
1. Press DVR on your remote
2. Press DVR again on your remote.
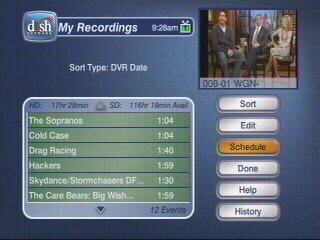
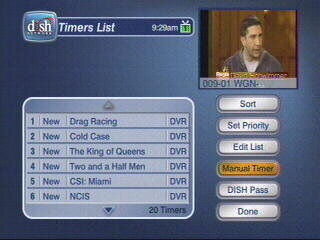
3. Highlight Schedule on your screen and press the SELECT button on your remote.
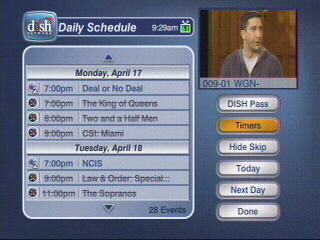
4. Highlight Timers on your screen and press the SELECT button on your remote.
5. Highlight Manual Timer on your screen and press the SELECT button on your remote.
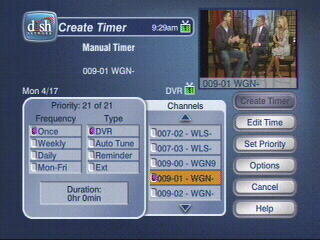
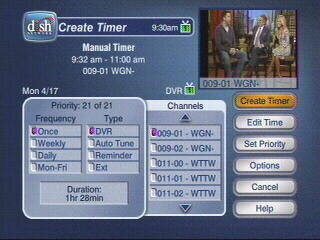
6. IN the LEFT box under FREQUENCY use your remote to cursor under how often you want the timer to fire.
7. IN the Center BOX use your remote to cursor to the TYPE box and select DVR or EXT (if external Hard Drive is used. NOTE: THE EXT FEATURE IS NOT ACTIVE AT THE TIME OF POSTING! )
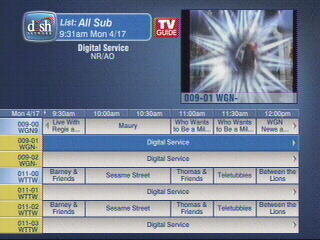
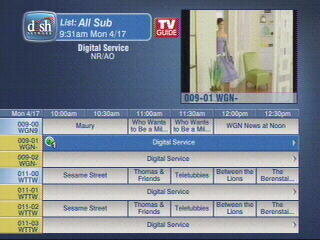
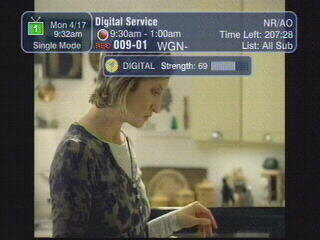
8. IN the Right box Use your remote to cursor to the Channels box and select the proper channel. (NOTE: I used WGN 9-01 which dish does not carry over the EPG GUIDE DATA from its SD version to the OTA HD version IN CHICAGO)
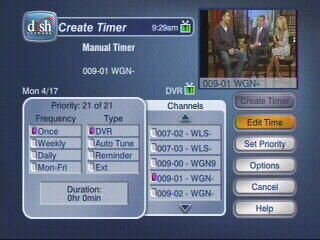
9. Use your remote to scroll over and select edit time and press the SELECT button on your remote control.
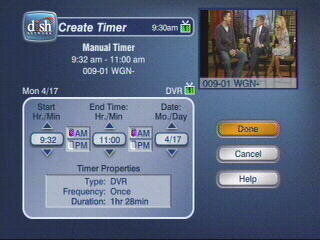
10. Use your remote to cursor to the times you want the timer to fire and use the key pad on the remote control to set the time. For 930 you would select 9 3 0 on your remote. for 1130 you would select 1 1 3 0 on your remote. Then use your remote to cursor to am or pm and select when you want your timer fire in the am slot or pm slot. Do the same for the end time.
11. Use your remote to cursor to done and press SELECT On your remote control.
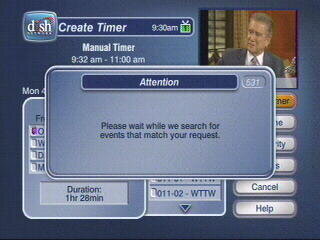
12. Highlight the create timer button with your remote control and press SELECT on your remote control.
13. An attention box will appear for 2-3 seconds
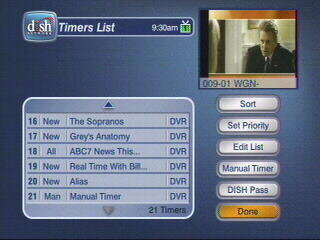
14. Verify the timer is in the timers list and select done.
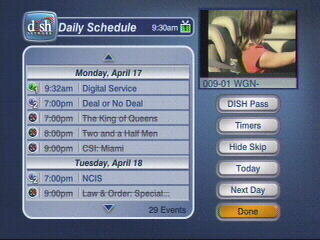
15. You should now see the timer in the daily schedule box and select done.
16. Press VIEW LIVE TV button to quickly exit out of all the menus.
17. In your guide when you scroll over that channel you set the timer on and will not see a timer in the guide.
18. Scroll to the time you set the timer up for the channel and the timer icon appears.
19. When the time comes for the timer to fire the timer fires.
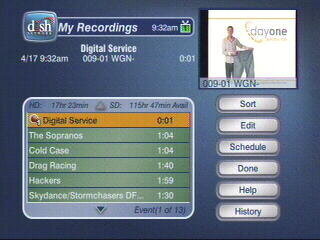
20. The recording shows up as DIGITAL SERVICE in the my recordings option (dvr button twice) for later viewing.
1. Press DVR on your remote
2. Press DVR again on your remote.
3. Highlight Schedule on your screen and press the SELECT button on your remote.
4. Highlight Timers on your screen and press the SELECT button on your remote.
5. Highlight Manual Timer on your screen and press the SELECT button on your remote.
6. IN the LEFT box under FREQUENCY use your remote to cursor under how often you want the timer to fire.
7. IN the Center BOX use your remote to cursor to the TYPE box and select DVR or EXT (if external Hard Drive is used. NOTE: THE EXT FEATURE IS NOT ACTIVE AT THE TIME OF POSTING! )
8. IN the Right box Use your remote to cursor to the Channels box and select the proper channel. (NOTE: I used WGN 9-01 which dish does not carry over the EPG GUIDE DATA from its SD version to the OTA HD version IN CHICAGO)
9. Use your remote to scroll over and select edit time and press the SELECT button on your remote control.
10. Use your remote to cursor to the times you want the timer to fire and use the key pad on the remote control to set the time. For 930 you would select 9 3 0 on your remote. for 1130 you would select 1 1 3 0 on your remote. Then use your remote to cursor to am or pm and select when you want your timer fire in the am slot or pm slot. Do the same for the end time.
11. Use your remote to cursor to done and press SELECT On your remote control.
12. Highlight the create timer button with your remote control and press SELECT on your remote control.
13. An attention box will appear for 2-3 seconds
14. Verify the timer is in the timers list and select done.
15. You should now see the timer in the daily schedule box and select done.
16. Press VIEW LIVE TV button to quickly exit out of all the menus.
17. In your guide when you scroll over that channel you set the timer on and will not see a timer in the guide.
18. Scroll to the time you set the timer up for the channel and the timer icon appears.
19. When the time comes for the timer to fire the timer fires.
20. The recording shows up as DIGITAL SERVICE in the my recordings option (dvr button twice) for later viewing.
Attachments
-
 Record manual ota01.jpg16.8 KB · Views: 628
 -
 Record manual ota02.jpg14.8 KB · Views: 578
 -
 Record manual ota03.jpg14.9 KB · Views: 515
 -
 Record manual ota04.jpg16.2 KB · Views: 487
 -
 Record manual ota05.jpg14.4 KB · Views: 444
 -
 Record manual ota06.jpg16.5 KB · Views: 304
 -
 Record manual ota07.jpg17 KB · Views: 474
 -
 Record manual ota08.jpg14.5 KB · Views: 471
 -
 Record manual ota09.jpg16.9 KB · Views: 446
 -
 Record manual ota10.jpg14.1 KB · Views: 407
 -
 Record manual ota11.jpg14.7 KB · Views: 440
 -
 Record manual ota12.jpg16.8 KB · Views: 421
 -
 Record manual ota13.jpg17.5 KB · Views: 464
 -
 Record manual ota14.jpg17.2 KB · Views: 434
 -
 Record manual ota15.jpg13.3 KB · Views: 439
 -
 Record manual ota16.jpg15.3 KB · Views: 496
")
") .
. That is why the devil sign was there. I have no problem with anyone telling someone how to make a manual timer for ota channels. Don't be so defensive. I was only trying to inject a little bit of humor in to a boring day.